Shopify Landing Page: Build One That Converts, With or Without an App
How to build a Shopify landing page with theme templates and sections or with a page builder app, what each route costs you in speed and lock-in, and how to track and check it.


You can build a good Shopify landing page without any app: give a page its own template, fill it with your theme's sections and send tagged links to it. A page builder app pays off when marketers must ship many pages without a developer, but check what happens to those pages if you leave. Below: both routes, five builder apps with pick and skip lines, what a page needs to convert, and how to track and test it.
What a landing page is on Shopify
Shopify has no special "landing page" object. A landing page is a normal page, product page or collection page that you have designed for one visitor and one action. It usually answers one ad, one email or one offer.
For most campaign pages you will use a Shopify page. Shopify's developer documentation describes a page as having a handle, a published state and an optional template suffix. The handle builds the page's address, and the suffix is how a page gets its own layout. Those fields are the foundation of a native landing page.
Route A: build it with Shopify's own tools
This route needs no app and adds no extra code to your store. It works best when your theme already has the sections you need.
Step 1: create a template just for this page
Themes built on Online Store 2.0 use JSON templates. A JSON template is a data file that lists sections and their settings, and merchants can add, remove and reorder those sections in the theme editor. Shopify's documentation says a JSON template can render up to 25 sections, and each section can have up to 50 blocks.
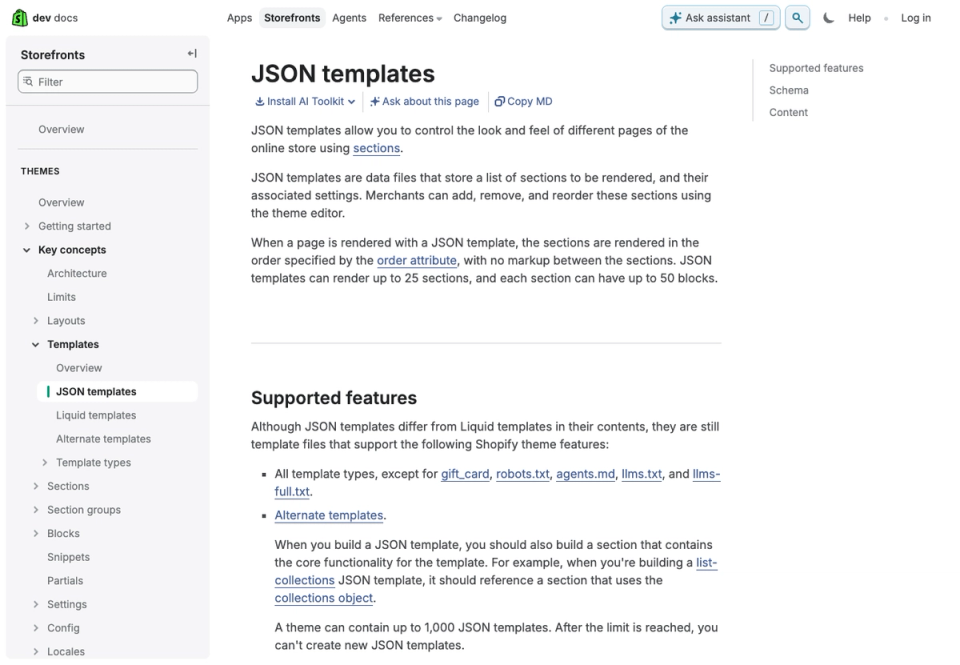
Every theme has a default page template. Shopify's documentation says you cannot replace the default with an alternate one, but you can create alternate templates next to it. An alternate template for pages uses the name page.suffix.json, where the suffix is a name you choose, such as page.spring-sale.json. You can create it in the theme editor, in the theme code editor or locally. Then you assign it to a page in the Shopify admin, and you can preview it on the storefront with a ?view=spring-sale parameter.
Keep your About page and your campaign pages on separate templates, so a change for one does not change the other.
For a deeper look at how sections and blocks work, see our guide to Shopify sections and blocks.
Step 2: build the page from sections
Open the new template in the theme editor and add sections. A section file must define presets in its schema to appear in the theme editor's add list. Sections without presets can only be added by editing the template file by hand, and they cannot be removed in the editor. If a section you expect is missing from the list, that is the first thing to check.
Apps can also add content here. Apps built with Shopify's theme app extension framework expose app blocks in the theme editor, so you can place things like a reviews widget inside a section without touching theme code. Shopify's documentation says these apps do not edit your theme code, which lowers the risk of breaking the theme.
Step 3: set the address
The page's handle is created automatically from its title, in lowercase, and Shopify makes duplicates unique by adding a number. You can change the handle in the admin. Shopify's Liquid documentation warns that if anything in your theme refers to a resource by its handle, you must update it when you change the handle. Pick a short, readable handle before you send any traffic, because every ad and email will carry it.
Step 4: keep it out of the navigation
Navigation menus are their own objects in Shopify. Each menu holds links, and a link can point to a page. So a page that nobody adds to a menu will not appear in your header or footer. This is the usual way to make a campaign page that is only reached from an ad or an email.
Two cautions:
- A page left out of the menu is not private. Anyone with the link can open it, and search engines can still find it by other routes.
- Shopify's API has a published flag and a publish date for pages, so a page can be unpublished or scheduled. Check the admin for where that switch sits.
We could not open Shopify's Help Center pages on menus and page visibility while writing this, because the site blocked our request. Check those pages for the click-by-click steps in your admin.
Step 5: decide if it should be indexed
Google says the way to keep a page out of its results is a noindex rule, either as a robots meta tag in the page head or as an X-Robots-Tag response header. Google also warns that the page must not be blocked by robots.txt. If it is, Google never sees the noindex rule and the page can still appear in results.
When should you do this? Only for a page that exists purely for paid traffic and repeats content you want ranked elsewhere. A landing page that answers a real search, such as a guide or a category, should be indexed.
If you edit theme code, one way to apply the rule to a single template is Shopify's template Liquid object, which returns the suffix of the alternate template in use. Put this in the <head> of your layout file:
{% if template.suffix == 'spring-sale' %}
  <meta name="robots" content="noindex">
{% endif %}
We did not run this snippet on a live store. Test it on a duplicate theme first and view the page source to confirm the tag appears only where you expect it. We did not find a Shopify developer page that documents a built-in noindex switch for pages, so check the SEO settings in your admin and Shopify's Help Center as well.
Step 6: when you need more than sections allow
Sometimes the theme's sections are not enough. A common case is a page with no header and no main menu, so the visitor has only one thing to do. Shopify's documentation says a JSON template can name a different layout file, so a developer can create a stripped-down layout and point your template at it. Using false as the layout renders the template with no layout at all, but templates without a layout cannot be customised in the theme editor. That is a developer job, and it is a good one to hand over. If you want help, talk to us.
Route B: use a page builder app
A page builder gives you a drag and drop editor, ready-made templates and often extras such as A/B testing and funnels. The real question is not features. It is where the page lives.
The two trade-offs to understand first
Speed. An app adds its own scripts and styles. Shopify's performance guidance lists removing or deferring render-blocking app scripts as a high impact fix, and it advises reserving space for app-injected content so the page does not jump while loading. We did not measure any of the apps below, and a vendor's own claims about speed are not proof. Run the page through PageSpeed Insights before you commit (see the speed section below).
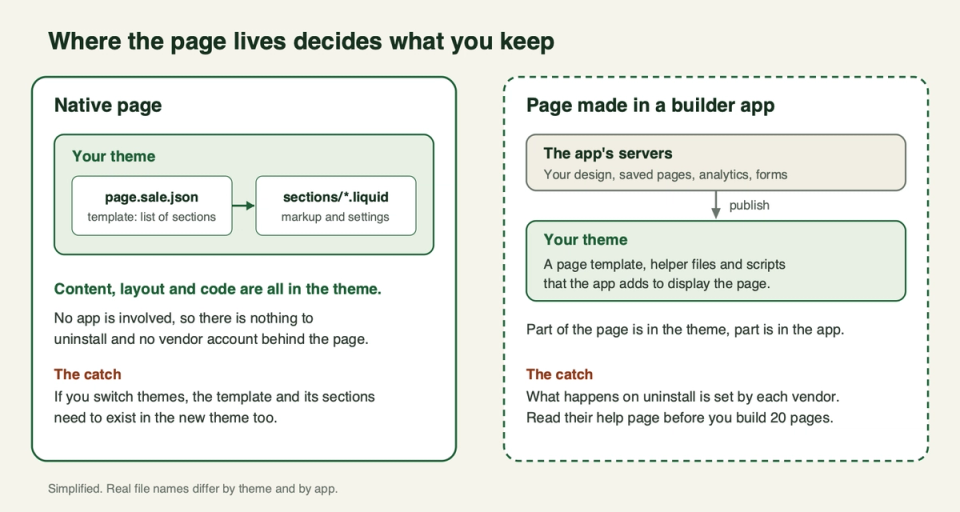
Lock-in. What happens on uninstall is decided by each vendor, and the vendors differ a lot. Read the vendor's own help page before you build 20 pages. We opened each one for the apps below.
Five apps worth a look
We read each app's own Shopify App Store listing and its vendor help pages. Features below are what the listings say, not features we have used. We have left out prices and review scores because they change; check the live listing.
PageFly
PageFly describes itself as an AI page builder and drag and drop editor. The listing mentions 320+ templates, A/B testing, click heatmaps and funnel analytics, and says a free plan is available.
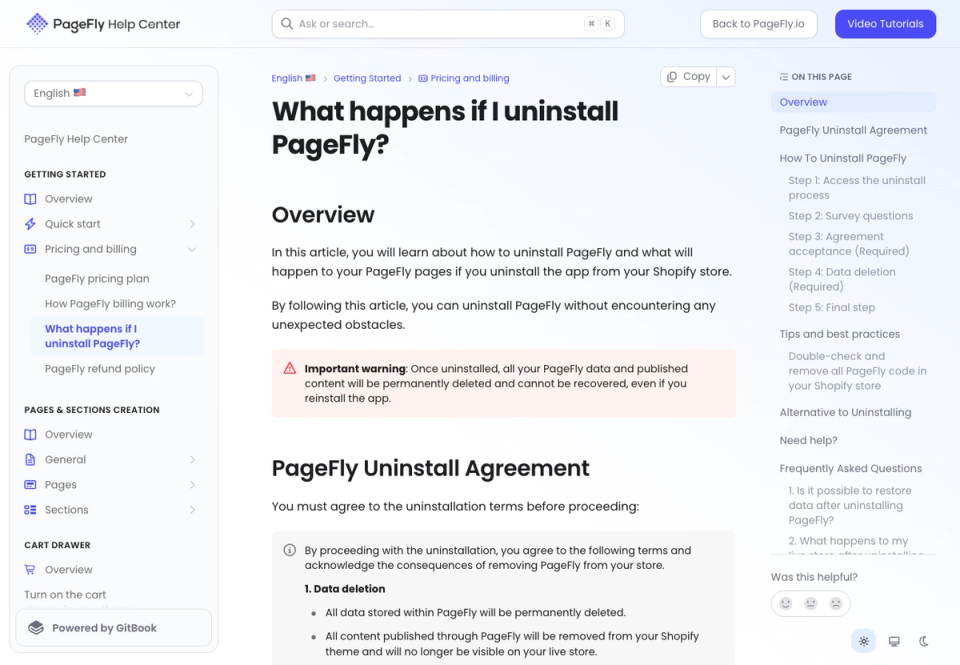
On uninstall, PageFly's help page is the strictest of the five (confirm on the app's own uninstall screen, since pricing pages elsewhere mention a keep-data option). It says all PageFly data and published content will be permanently deleted and cannot be recovered, even if you reinstall. Content published through PageFly is removed from your theme and no longer visible on your live store. The page also gives manual steps for checking leftover PageFly code in your theme afterwards. It points to downgrading to the free plan as the alternative, so check in the app what the free plan keeps.
- Pick this if: you accept that the pages exist only while you keep the app, and you want AI drafting plus built-in testing.
- Skip this if: you want pages that outlive the subscription.
GemPages
GemPages focuses on conversion pages and sales funnels. The listing mentions 400+ templates, post-purchase upsells and downsells, A/B offer testing, scheduled launches and an AI workflow, and says a free plan is available.
On uninstall, GemPages' help page says removing the app can remove files and scripts needed to display some content, which may cause display issues, and that reinstalling restores them. It recommends downgrading to the free plan instead, which keeps live pages intact and editable, though with more than one published page you cannot re-publish them. It also offers import and export before you leave, and says personal data is erased 48 hours after uninstall unless you reinstall.
- Pick this if: you want funnel features (upsell after checkout, offer tests) in the same tool as the page.
- Skip this if: you plan to leave the app and keep the pages looking the same.
Shogun
Shogun is a visual editor for landing pages, product pages, collection pages and more. Its listing shows a Shopify Plus Certified badge, a free plan and a free trial. It says A/B testing is a separate app.
Shogun's help page for Shopify says published pages stay live after you uninstall, served as pure HTML. Some data stored inside Shogun is removed, including analytics, audits, form data and sync data, and Shogun forms stop working once that data is removed. Custom forms keep working. The page also warns that editing a Shogun page outside Shogun may strip its styling.
- Pick this if: keeping your pages after you leave matters more to you than keeping the tool's data.
- Skip this if: you rely on Shogun's own forms or analytics, or you want testing inside the same app.
Replo
Replo positions itself for marketing teams and performance work. The listing mentions 1000+ templates, Online Store 2.0 sections, analytics and experiments, and a network of Replo experts you can hire. The listing says a free plan is available, but the pricing section on the same listing describes the free tier as previews only. Check what you can publish before you plan around it.
Replo's help article on unused files says Replo adds only the files needed for your content and removes them when you delete that content. After an uninstall, Shopify does not let Replo clean up, so files may stay until you delete them by hand. A separate uninstall article says to downgrade to the free plan "so that your pages are accessible". Both Replo articles are about two years old, and that advice seems to conflict with the pricing section, so ask Replo before you rely on it.
- Pick this if: you have a marketing team that wants testing built in.
- Skip this if: you need to publish on the free tier.
Zipify Pages
Zipify Pages is aimed at direct-response selling: landing pages, product pages and blog pages, with templates, bundles and split testing. The listing says a free plan is available.
Zipify's help center describes what it adds to your theme: template files, snippet files, render tags in theme.liquid and include tags in your product template files. It says to click Remove Assets in the app before deleting the app. After that, published pages stay on your site but lack the styles and code they need, so they look wrong and may not work. Zipify also says pages, images and code are removed from its servers 90 days after you delete the app, and that to hide published pages you must unpublish them first.
- Pick this if: you sell with long-form, direct-response pages and want templates built for that.
- Skip this if: you want to keep your theme free of added files and edits to
theme.liquid.
Other builders exist. For example, Instant lists an AI first draft, Figma import and a template library. We did not read its uninstall documentation, so we have not judged it here.
Side by side
| App | Strength named on its listing | Testing named on its listing | What the vendor says happens on uninstall |
|---|---|---|---|
| PageFly | AI drafting, many page types | A/B testing, heatmaps | Data and published content deleted, no recovery |
| GemPages | Funnels and post-purchase offers | A/B offer testing | Files removed, display issues possible, reinstall restores |
| Shogun | Visual editor for many page types | Separate A/B app | Pages stay as HTML, forms and some data lost |
| Replo | Templates for marketing teams | Analytics and experiments | Theme files may stay behind; downgrading to free is said to keep pages accessible (older articles) |
| Zipify Pages | Direct-response templates and bundles | Split testing | Pages stay but lose styles after assets are removed |
The table summarises each vendor's own help pages. Policies change, so read the live page before you install.
What a landing page that converts needs
We do not quote conversion rates here, because none of them travel from one store to another. What does travel is a short list of habits, and Google's own Ads guidance supports most of them.
Google's guidance for landing pages says the page should closely match the ad and keywords that sent the visitor, and should mirror the call to action in the ad. If the ad promises a free sample, the page should offer the sample, not a general shop. Google also says to put key information near the top so visitors do not have to scroll, keep navigation simple, avoid clutter and pop-ups, make the page work on mobile, and provide useful, original content such as real customer reviews.
Our order for the sections, using sections most themes already have:
- Headline and subheading. Repeat the promise from the ad in the same words.
- One main button. One clear action, shown at the top and repeated further down.
- Product or offer. What it is, who it is for, what is included. Use real photos, with alt text.
- Proof. Real reviews from real customers. Do not add a number you cannot show.
- Objections. Delivery, returns and "how does it work", in a short FAQ.
- A last button. The same action as the first.
Three judgement calls we make:
- Cut the exits. A full menu gives visitors many places to go. Removing it is a developer change, so weigh it against the page's traffic.
- Keep forms short. Ask only for what the next step needs.
- Plan the step after. Decide what the visitor sees once they act, so the page does not just end.
Track the campaign
Tag every link that points to the landing page, so your analytics can tell the campaigns apart. Google Analytics reads standard UTM parameters on the link.
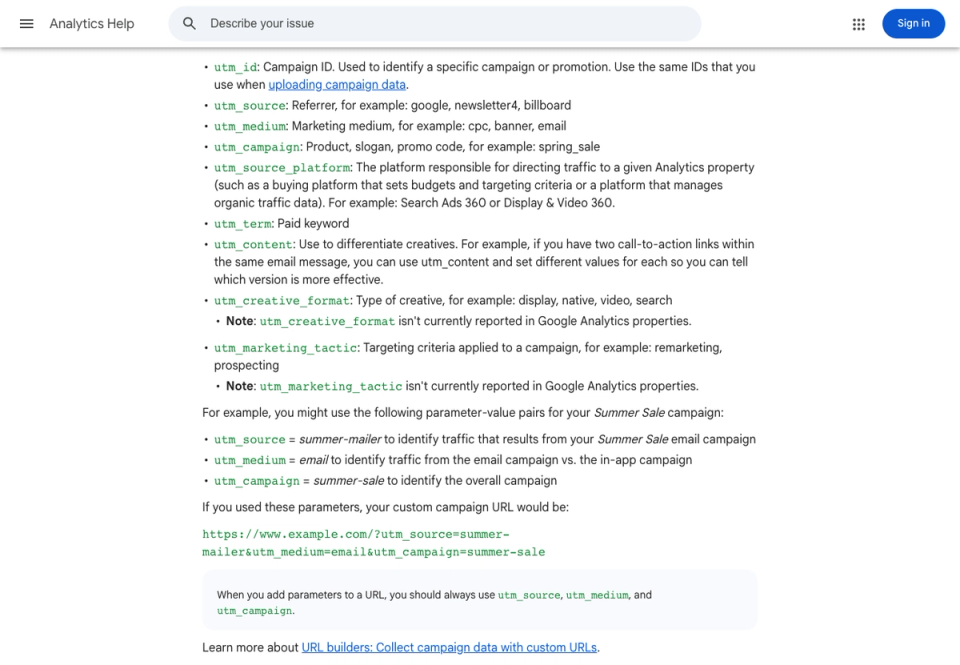
Google's documentation lists the parameters. The ones to always include are utm_source (where the link sits, such as a newsletter), utm_medium (the channel, such as email) and utm_campaign (the campaign name). utm_content tells apart two links in the same email, and utm_term holds a paid keyword. A full link looks like this:
https://your-store.com/pages/spring-sale?utm_source=newsletter&utm_medium=email&utm_campaign=spring-saleRules from Google's page that save you trouble:
- Parameter values are case sensitive.
Metaandmetacount as different values, and so doSpringSaleandSpring_Sale. Pick lowercase and stick to it. - Use one consistent name for each platform and each channel, so one campaign does not split into several rows.
- If you set one UTM parameter, set the full set. Google says missing parameters show up as
(not set)in reports. - UTM values do not appear in the "Landing page + query string" dimension. They are in the "Page location" dimension instead.
Before you spend money, click one of your own tagged links and confirm the visit appears in your analytics with the right source, medium and campaign. We did not open Shopify's pages on its own marketing reports, so check those too if you use them.
Check speed and accessibility before launch
Speed
Google's Core Web Vitals targets are: Largest Contentful Paint within 2.5 seconds, Interaction to Next Paint of 200 milliseconds or less, and Cumulative Layout Shift of 0.1 or less, measured at the 75th percentile of page loads.
PageSpeed Insights shows two kinds of data. Lab data is a simulated load, which is useful for finding faults. Field data comes from real users over the previous 28 days. Google says a recently published page may not have enough field data, so the tool can fall back to data for the whole site. A new landing page will often show lab data only, so judge it on that and look again after it has real traffic.
Shopify's own performance guidance gives the fixes that matter most for a hero-led page:
- Never lazy-load the image that is largest on the first screen, and mark it with
fetchpriority="high". - Do not hide that image behind a fade-in animation.
- Keep the main content in Liquid and HTML, not injected by JavaScript.
- Remove or defer app scripts that block rendering, and reserve space for content apps add so the layout does not jump.
Our full walkthrough is in the Shopify theme performance guide.
Accessibility
Shopify's accessibility guide for themes, which follows WCAG, gives numbers you can test:
- Text under 24 px (18.5 px if bold) needs a contrast ratio of 4.5 to 1 against its background. Larger text needs 3 to 1.
- Icons and form input borders need 3 to 1.
- Touch targets for main controls and links should be at least 44 by 44 pixels.
- Every form field needs a label, and error messages must be clear and announced to screen readers.
- Use an
h1for the main topic and keep headings in order, not for styling. - Images need alt text, and decorative images should have an empty
alt.
The guide points to Lighthouse, WAVE and Accessibility Insights for testing, and notes that following its list does not guarantee a fully accessible theme. A manual pass with the keyboard alone is a good extra check. See our theme accessibility guide for more.
How to choose
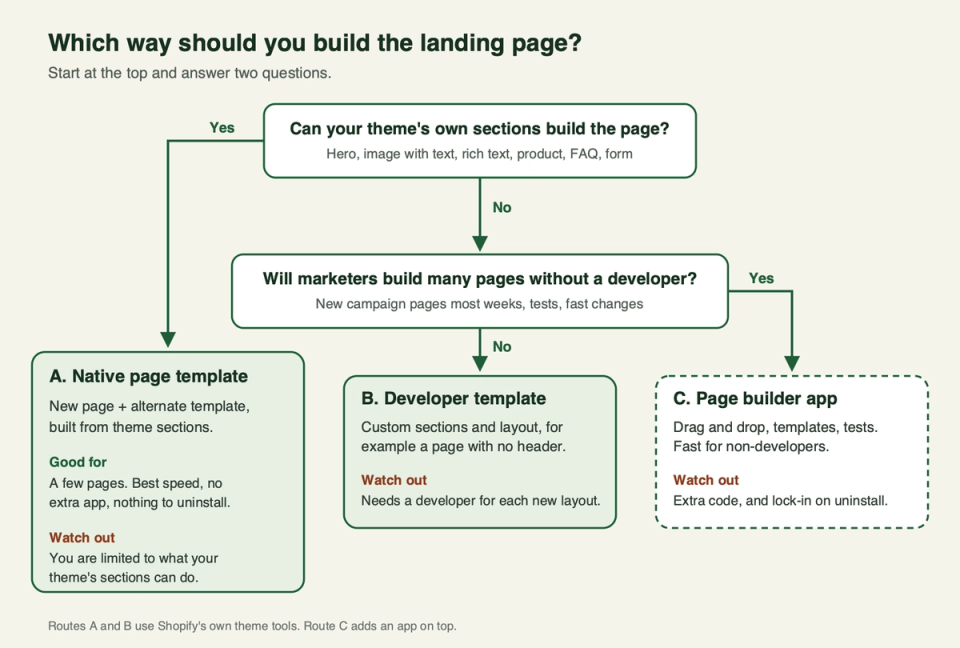
- Pick the native route if you need one to a few pages and your theme has the sections. It is the fastest, cheapest to keep and has no lock-in.
- Pick a developer template if you want a custom layout, such as a page with no header, or a page type you will reuse often.
- Pick a builder app if marketers will ship many pages without a developer. Choose the vendor by its uninstall behaviour as much as its features, and keep a plan to rebuild if you leave.
- Avoid mixing builders. Two apps adding their own scripts and files make speed problems harder to trace.
Frequently asked questions
Do I need an app to make a landing page on Shopify?
No. You can create a page, give it an alternate template, and build it from your theme's sections in the theme editor. An app helps when many non-developers need to ship many pages.
How do I hide a landing page from my menu?
Do not add it to any navigation menu. Menus are separate objects, and a page appears in a menu only if you add a link to it. This does not make the page private, and it does not stop search engines from finding it.
Can I remove the header and footer from a landing page?
Not from the theme editor alone. A developer can create a layout file without them and point your template at it. Shopify's documentation says a template with no layout at all cannot be customised in the theme editor.
Should I noindex a landing page?
Only if it exists for paid traffic and duplicates content you want to rank elsewhere. Google says to use a robots meta tag or an X-Robots-Tag header, and not to block the page in robots.txt, or Google will not see the rule.
Do page builders slow down my store?
They add scripts and styles, and Shopify's guidance names app scripts as a common cause of slow pages. We did not measure any builder, so test your own page with PageSpeed Insights, with and without the app if you can.
What happens to my pages if I uninstall a page builder?
It depends on the vendor. PageFly says published content is deleted. GemPages says files may be removed and display problems can follow. Shogun says published pages stay as HTML but some data goes. Replo says theme files may stay behind. Zipify says pages lose their styles once assets are removed. Read the vendor's page first.
What should the URL look like?
Short, lowercase and readable, like the offer or campaign name. Shopify creates the handle from the title, makes duplicates unique and lets you edit it in the admin. Set it before launch, because ads and emails will carry it.